In this post, I will show you how to build an age gender classification application with the infrastructures I created in the last post. Almost everything are same as before, except the part of parsing the NDArray in the forward function.
Before we dive into the source codes, let us have some examples. The images are predicted by two networks and concatenate, left side predicted by light model, right side predicted by heavy model based on resnet50.
The results do not looks bad for both of the models if we don't know their ages :), let us use the model to predict the ages of famous person, like trumps(with resnet50).
Unfortunately, results of age classification are not that good under different angles and expressions, this is because age classification from an image is very difficult, even human cannot accurately predict ages of persons by looking at a single image.
1. Difference of face recognition and age gender classification
The codes of parsing face recognition features are
std::vector<insight_face_key> result;
size_t constexpr feature_size =512;
Shape constshape(1, feature_size);
for(size_t i =0; i != batch_size; ++i){
NDArray feature(features.GetData() + i * feature_size, shape, Context(kCPU, 0));
result.emplace_back(std::move(feature));
}
The codes of parsing age and gender classification are
std::vector<insight_age_gender_info> result;
int constexpr features_size =202;
for(size_t i =0; i != batch_size; ++i){
autoconst*ptr = features.GetData() + i * features_size;
insight_age_gender_info info;
info.gender_ = ptr[0] > ptr[1] ? gender_info::female_ : gender_info::male_;
for(int i =2; i < features_size; i +=2){
if(ptr[i +1] > ptr[i]){
info.age_ +=1;
}
}
result.emplace_back(info);
}
Except of these part, everything are the same as before.
2. Make codes easier to reuse
It is a pain to maintain similar codes with minor difference, in order to alleviate the prices of maintenance, I create a generic predictor as a template class with three policies, implement the face recognition and age/gender classification with this generic predictor.
template<typename Return, typename ProcessFeature, typename ImageConvert = dlib_mat_to_separate_rgb>classgeneric_predictor
{
/*please check the details on github*/
}
We could use it like to create age gender predictor as following
struct predict_age_gender_functor
{
std::vector<insight_age_gender_info>operator()(const mxnet::cpp::NDArray &features, size_t batch_size) const
{
std::vector<insight_age_gender_info> result;
int constexpr features_size =202;
for(size_t i =0; i != batch_size; ++i){
autoconst*ptr = features.GetData() + i * features_size;
insight_age_gender_info info;
info.gender_ = ptr[0] > ptr[1] ? gender_info::female_ : gender_info::male_;
for(int i =2; i < features_size; i +=2){
if(ptr[i +1] > ptr[i]){
info.age_ +=1;
}
}
result.emplace_back(info);
}
return result;
}
};
using insight_age_gender_predict = mxnet_aux::generic_predictor<insight_age_gender_info, predict_age_gender_functor>;
Please check github if you want to know the implementation details.
3. Summary
Gender prediction works very well, unfortunately age predictions is far from ideal. If we could obtain huge data set, which contain the face of the same
person with different range of ages, expression, angles and the number
of races are not super imbalance, accuracy of age accuracy may improve very much, but a huge data set like this is very hard to collect.
In this post I will show you how to implement an industrial level, portable face recognition application with a small, reuseable example, without relying on any commercial library(except of Qt5, unless the module I use in this example support LGPL license).
Before deep learning become main stream technology in computer vision fields, 2D face recognition only works well under strict environments, this make it an impractical technology.
Thanks to the contributions of open source communities like dlib, opencvand mxnet, today, high accuracy 2D face recognition is not a difficult problem anymore.
Before we start, let us see an interesting example(video_00).
video_00
Although different angles and expressions affect the confidence value a lot, but in most of the time the algorithm still able to find out the most similar faces from 25 faces.
The flow of face recognition on github are composed by 4 critical steps.
pic_00
Detect face by dlib
std::vector<mmod_rect> face_detector::forward_lazy(const cv::Mat &input){//make sure input image got 3 channels
CV_Assert(input.channels()==3);//Resize the input image to certain width, //The bigger the face_detect_width_, more //faces could be detected, but will consume//more memory, and slowerif(input.cols != face_detect_width_){//resize_cache_ is a simple trick to reduce the//number of memory allocationdoubleconst ratio = face_detect_width_ /static_cast<double>(input.cols);
cv::resize(input, resize_cache_,{}, ratio, ratio);}else{
resize_cache_ = input;}//1. convert cv::Mat to dlib::matrix//2. Swap bgr channel to rgb
img_.set_size(resize_cache_.rows, resize_cache_.cols);
dlib::assign_image(img_, dlib::cv_image<bgr_pixel>(resize_cache_));return net_(img_);}
Face detector of dlib perform very well, you can check the results on their post.
If you want to know the details, please study the example provided by dlib, if you want to know more options, please study the excellent post of Learn Opencv.
Perform face alignment by dlib
We can treat face alignment as a data normalization skills develop for face recognition, usually you would align the faces before training your model, and align the faces when predict, this could help you obtain higher accuracy.
With dlib, face alignment become very simple. Just a few lines of codes.
//rect contain the roi of the face
dlib::matrix<rgb_pixel> face_detector::
get_aligned_face(const mmod_rect &rect){//Type of pose_model_ is dlib::shape_predictor//It return the landmarks of the faceauto shape = pose_model_(img_, rect);
matrix<rgb_pixel> face_chip;autoconst details =
get_face_chip_details(shape, face_aligned_size_,0.25);//extract face after aligned from the image
extract_image_chip(img_, details, face_chip);return face_chip;}
Extract features of face by mxnet
This section will need to load the model from mxnet, unlike dlib or opencv, the c++ api of mxnet is more complicated, if you do not know how to load the model of mxnet yet, I recommend you study this post.
This section is the most complicated part, because it containsthree main points.
1. Extract the features of faces.
2. Perform batch processing.
3. Convert aligned face of dlib(store as matrix<rgb_pixel>) to a memory continuous float array with
the format expected by the mxnet model.
A.Load the model with variable batch size
In order to load the model which support variable batch size, all we need to do is add one more argument to the argument list.
std::unique_ptr<Executor> create_executor(conststd::string&model_params,conststd::string&model_symbols,const Context &context,const Shape &input_shape){
Symbol net;std::map<std::string, NDArray> args, auxs;
load_check_point(model_params, model_symbols,&net,&args,&auxs, context);//if "data" throw exception, try another key, like "data0"
args["data"]= NDArray(input_shape, context,false);//we only need to add the new key if batch size larger than 1if(input_shape[0]>1){//all we need is the new key "data1"
args["data1"]= NDArray(Shape(1), context,false);}std::unique_ptr<Executor> executor;
executor.reset(net.SimpleBind(context,
args,std::map<std::string, NDArray>(),std::map<std::string, OpReqType>(),
auxs));return executor;}
B.Convert aligned face to array
Unlike the example of yolo v3, the input data of deepsight need more preprocess steps before you can feed the aligned face into the model. Instead of arranged the pixels as rgb order, you need to split each channels of the face into separate "page". Simply put, instead of arrange the pixels as
R1G1B1R2G2B2......RnGnBn
We should arrange the pixels as
R1R2....RNG1G2......GNB1B2.....BN
//using dlib_const_images_ptr = std::vector<matrix<rgb_pixel> const*>;void face_key_extractor::
dlib_matrix_to_float_array(dlib_const_images_ptr const&rgb_image){size_t index =0;for(size_t i =0; i != rgb_image.size();++i){for(size_t ch =0; ch !=3;++ch){for(long row =0; row != rgb_image[i]->nr();++row){for(long col =0; col != rgb_image[i]->nc();++col){autoconst&pix =(*rgb_image[i])(row, col);switch(ch){case 0://image_vector_ is a std::vector<float>, resized in //constructor.//image_vector_.resize(params_->shape_.Size())//params_->shape_.Size() return total number //of elements in the tenso
image_vector_[index++]= pix.red;break;case 1:
image_vector_[index++]= pix.green;break;case 2:
image_vector_[index++]= pix.blue;break;default:break;}}}}}}
C.Forward aligned faces with variable batch size
There are two things you must know before we dive into the source codes.
1. To avoid memory reallocation, we mustallocate memory for the largest possible batch size and reuse that same
memory when batch size is smaller.
2. The batch size of the float array input to the model must be the same as the largest possible batch size
//input contains all of the aligned faces detected from the imagestd::vector<face_key> face_key_extractor::
forward(conststd::vector<dlib::matrix<dlib::rgb_pixel>>&input){if(input.empty()){return{};}//Size of the input may not divisible by batch size//That is why we need some preprocess job to make sure//features of every faces are extractedautoconst forward_count =static_cast<size_t>(std::ceil(input.size()/static_cast<float>(params_->shape_[0])));std::vector<face_key> result;for(size_t i =0, index =0; i != forward_count;++i){
dlib_const_images_ptr faces;for(size_t j =0;
j != params_->shape_[0]&& index < input.size();++j){
faces.emplace_back(&input[index++]);}
dlib_matrix_to_float_array(faces);auto features =
forward(image_vector_,static_cast<size_t>(faces.size()));std::move(std::begin(features),std::end(features),std::back_inserter(result));}return result;}
D.Extract features of faces
std::vector<face_key> face_key_extractor::
forward(conststd::vector<float>&input,size_t batch_size){
executor_->arg_dict()["data"].SyncCopyFromCPU(input.data(),
input.size());//data1 tell the executor, how many face(s) need to process
executor_->arg_dict()["data1"]= batch_size;
executor_->Forward(false);std::vector<face_key> result;if(!executor_->outputs.empty()){//shape of features is [batch_size, 512]auto features = executor_->outputs[0].Copy(Context(kCPU,0));
Shape const shape(1, step_per_feature);
features.WaitToRead();//split features into and arrayfor(size_t i =0; i != batch_size;++i){//step_per_feature is 512, memory //of NDArray is continuous make things easier
NDArray feature(features.GetData()+ i * step_per_feature,
shape, Context(kCPU,0));
result.emplace_back(std::move(feature));}return result;}return result;}
Find most similar faces from database
I use cosine similarity to compare similarity in this small example, it is quite easy with the help of
Find the most similar face is really easy, all we need to do is compare the features stored in the array one by one and return the one with the highest confidence.
//for simplicity, I put struct at here in this blogstruct id_info
{double confident_ =-1.0;std::string id_;};struct face_info
{
face_key key_;std::string id_;};
face_reg_db::id_info face_reg_db::
find_most_similar_face(const face_key &input)const{
id_info result;//type of face_keys_ is std::vector<face_info>for(size_t i =0; i != face_keys_.size();++i){autoconst confident =
face_keys_[i].key_.similarity(input);if(confident > result.confident_){
result.confident_ = confident;
result.id_ = face_keys_[i].id_;}}return result;}
Summary
In today's post, I show you the most critical parts of face recognize with opencv, dlib and mxnet. I believe this is a great starting point if you want to build a high quality face recognition app by c++.
Real world applications are much more complicated than this small example since they always need to support more features and required to be efficient, but no matter how complex they are, the main flow of the 2D face recognition are almost the same as this post show you.
Person re-id comparing two images of person captured under different conditions, recently this field achieve big improvement with the helps of deep learning, but is it good enough to identify person do not exist in the data set? This is the question I want to figure out in this post.
Let me show you an example before we start.
The results are not perfect yet, let us hope that better techniques and larger data sets would release in the future. The algorithm itself is very easy, main flows are drawn in pic00
pic00
For those who wants to read the source codes directly, please go to github, in order to compile it, you will need opencv3.4.2 and mxnet. You can pick every build tools you like, I use qmake in this example. If you want to know how to reproduce the results, please read on.
1. Download pretrained model of person re-id
Download pretrained model from here. Precision and mAP of this model perform on market1501 are
If you want to train it by yourself, please follow the guide of gluoncv, it is quite easy.
2. Download pretrained model of yolo v3
Download pretrained model from here. This is the model converted from the pretrained model of gluoncv.
3. Detect person from video by yolo v3
Before we perform person re-id, we need to detect person from the video, yolo v3 works well for this task, you could find more details in this blog. It show you how to load the models trained by gluoncv(or mxnet) too, you will need that skills to load the model of person re-id too.
4. Extract features of person
After we find out bounding boxes of the persons, we need to extract the features of the persons, this could be done by mxnet without much issues.
cv::Mat_<float> person_feautres_extractor::get_features(const cv::Mat &input){//convert cv::Mat to ndarrayauto data = to_ndarray_->convert(input);
data.CopyTo(&executor_->arg_dict()["data"]);
executor_->Forward(false);
cv::Mat_<float> result(1,2048);if(!executor_->outputs.empty()){//copy data to cpu by synchronize api since
//Forward api of mxnet is async
executor_->outputs[0].SyncCopyToCPU(result.ptr<float>(),2048);}return result;}
5. Find out most similar persons from the features pool
I use cosine similarity to compare two features in this experiment.
Then find out the most similar features in the db, return the id in the db if similarity value greater
than threshold, else create a new id and return it.
std::vector<visitor_identify::visitor_info> visitor_identify::
detect_and_identify_visitors(const cv::Mat &input){//detect persons in the input
obj_det_->forward(input);autoconst input_size = cv::Size(input.cols, input.rows);autoconst detect_results = obj_filter_->filter(obj_det_->get_outputs(), input_size );std::vector<visitor_info> result;for(autoconst&det : detect_results){//extract features from the personautoconst feature =
feature_extract_->get_features(input(det.roi_).clone());//find most similar features in the databaseautoconst id_info = db_->find_most_similar_id(feature);
visitor_info vinfo;
vinfo.roi_ = det.roi_;//if the confident(similarity) of the most similar features //were greather than the threshold//return the id found in the db, else add a new id and return itif(id_info.confident_ > re_id_threshold_){
vinfo.id_ = id_info.id_;
vinfo.confidence_ = id_info.confident_;}else{autoconst new_id = db_->add_new_id(feature);
vinfo.id_ = new_id;
vinfo.confidence_ =1.0f;}
result.emplace_back(std::move(vinfo));}return result;}
GluonCV come with lots of useful pretrained model for object detection, including ssd, yolo v3 and faster-rcnn. Their website come with an example to show you how to fine tune your own data set with ssd, but they do not show us how to do it with yolo v3. If you were like me, struggling in training your custom data with yolo v3, this post may ease your pain since I already modify the script to help you train your custom data.
1.Select a tool to draw your bounding box
I use labelImg for my purpose, easy to install and use on windows and ubuntu.
2.Convert the xml files generated by labelImg to lst format
I write some small classes to perform the conversion task, you can find them on github, if you cannot compile it, please open an issue at github.You don't need opencv and mxnet for this task after all.
3.Convert lst file to rec format
Follow the instructions at here, study how to use im2rec.py should be enough.
4. Adjust the train_yolo3.py, make it able to read file with rec format
I do this part for you already, you can download the script(train_yolo3_custom.py) from github. Before you use that, you will need to
Move it to the folder of gluoncv.utils.metrics(mine is C:\my_folder\Anaconda3\Lib\site-packages\gluoncv\utils\metrics)
Change the codes from from gluoncv.utils.metrics.voc_detection import VOC07MApMetric to from gluoncv.utils.metrics.voc_detection_2 import VOC07MApMetric
This is because the voc_detection.py Anaconda on windows got bug, if your voc_detection.py is fine, you can omit this step and change from gluoncv.utils.metrics.voc_detection_2 to import VOC07MApMetric gluoncv.utils.metrics.voc_detection import VOC07MApMetric
You can prefer to install nightly release too if you want to save some troubles.
5.Enter command to train your data
I add a few command line options in this script, they are
--train_dataset : Location of the rec file for training
--validate_dataset: Location of the rec file validate
--pretrained: If you enter this, it will use the pretrained weights of coco dataset, else only use the pretrained weights of imageNet.
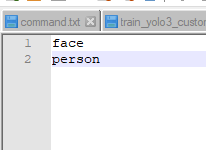
--classes_list : Location of the file with the name of classes. Every line present one class, each class should match with their own id. Example :
pic00
ID of face is 0 so it is put at line 0, ID of person is 1 so it is put at line 1
1. If you do not enter --no-random-shape, you better make your learning rate lower(ex : 0.0001 instead of 0.001), else it is very easy to explode(loss become nan).
2. Not every dataset works better with random-shape, run a few epoch(ex : 5) with smaller data(ex , 300~400 images) to find out which parameters works well.
3. Enable random-shape will eat much more ram, without it I can set my batch-size as 8, with it I could only set my batch-size as 3.
7. Measure performance
In order to measure the performance, we need a test set,unfortunately there do not exist a test set which designed for human and face detection, therefore I pick two data sets to measure the performance of the trained model. FDDB for face detection(the label of FDDB is more like head rather than face), Pascal Voc for human detection. You can find the validate_yolo3.py at github.
The model I used train with 40 epoch, the mAP of this on model on the training set is close to 0.9. Both of the experiments are based on IOU = 0.5.
7.1 Performance of face detection
mAP close to 1.0 when IOU is 0.5, this looks too good for real, let us check the inference results by our eyes to find out what is happening. Following images are inference with input-shape as 320 with the model trained with 40 epochs.
pic01(2002/08/11/big/img_534.jpg)
pic02(2002/08/11/big/img_558.jpg)
pic03(2002/08/11/big/img_570.jpg)
pic04(2002/08/11/big/img_58.jpg)
pic05(2002/08/11/big/img_726.jpg)
pic06(2002/08/11/big/img_752.jpg)
pic07(2002/08/11/big/img_478.jpg)
pic08(2002/08/11/big/img_492.jpg)
pic09(2002/08/11/big/img_496.jpg)
From these pictures(pic01~pic09), we know the model works quite well.
Usually mAP of test would not higher than training set, either this test set is far too easy than the training set, or this detector is overfit to this test set. No matter what, this test set is not good enough to measure the performance of the face detector.
7.2 Performance of person detection
Unlike face detector, mAP of person detector only got 0.583mAP on the images listed by person_val.txt(I only apply on the images contain person), there are still a big room to improve the accuracy.
Adding more data may improve the performance since this test results tell us this model got high variance, in order to find out what kind of data we should add, one of the solution is study the mis-classify or the person cannot detected by eyes, then write down the reasons.
pic10(2008_000003.jpg)
pic11(2008_000032.jpg)
pic12(2008_000051.jpg)
pic13(2008_000082.jpg)
pic14(2008_000138.jpg)
After we gather the data, we can create a table, list out the name of the images and describe the errors(pic15, a small example).
pic15
With the helps of error analysis like this, we could find out which part we should put more focus into, and what kind of data we should collect. From the experiments we can find out accuracy of yolo v3 is very high, although recall got lots of space to improve.
8. Model and data
You can find the model and data at mega. I do not put the data with images but the annotations only, you need to download the images by yourself(since I worry this may have legal issues if I publish the data). Not only added the bounding boxes for person, I also adjust the bounding boxes of faces a lot, original bounding boxes provided by kaggle are more like designed for "head detector" rather than "face detector".
9. Conclusion
This detector got a lot of space to improve, especially the mAP of human, but it will take a lot of times to do it so I decide to stop at here. My annotations of the humans, you can find a lot of them are overlap with other person a lot, bounding boxes without overlap with the person may help the models detect more persons.
You can use the annotations and model as your free will, do me a favor by reference this site if you do use them, thanks.